
- Posts: 272
- Thank you received: 1125
Iray Decals / Iray FireFight
05 May 2022 17:25 #74056
by Gincognifo
This message has attachments images.
Iray Decals / Iray FireFight was created by Gincognifo
Iray decals are a little tricky to work with. The idea is that they "paint" a texture onto another surface. Most of the time I would edit a texture directly or use a geometry shell, but sometimes the underlying model doesn't work for what I want to add. In that case, an Iray decal will do the trick.
First gotcha to remember is that IRay decals only show up in IRay mode. They will show up in a final render, but will only show in the preview window if you have selected "NVIDIA IRay" from the dropdown. When you're working with IRay decal nodes, you have to work in IRay mode or it's almost impossible. This may mean you need to work with a subset of your scene or the preview will be slow to update.
We're going to start with one of the decals from the Iray FireFight product since they have quirks of their own.
To start, we have a simple wall. This is a Primitive plane with a concrete shader applied.
Select the wall and add the "KAFF Standalone Decal" Prop.
Select the Decal prop and add the "KAFF Metal Bullet Holes" Material
You'll note that the prop helpfully disappears at this point. This is because the bullet holes are the only visible part of the surface and they are not being "painted" onto the wall.
Rotate your view so that you can see the bounding rectangle of the Decal prop and move it so that the front of the box is closer to the wall.
At this point you may see a "smear" of an image on the wall (or you may see the bullet holes correctly, it depends on the orientation of the wall).
If you don't see the bullet holes, rotate the Decal prop. In this case, A "Y Rotate" of 90 degrees brought it into the correct orientation.
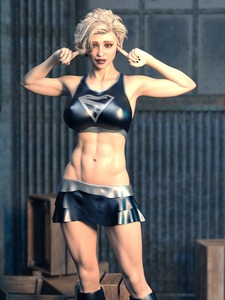
Now, we're going to add the classic 'S' logo to a piece of clothing.
We start with a figure and a suit.
Select the suit and create an Iray Decal Node. (Create/New Iray Decal Node). Select the Decal Node, Select the Surface tab, Select the "Reverse" surface and bring the cutout opacity down to 0%. We are only going to use the "Front" surface. (But yes, that means a Decal can paint the front and back of an object at the same time).
Select the "Front" surface and apply a suitable shader. You want something that uses Horizontal and Vertical tile values of 1, otherwise the logo will be repeated. I usually use a white latex shader from Plastic and Latex Iray Shaders
Move the Decal up by adjusting the "Y Translate" until the white material shows on the suit.
Set the image for "Base Color" on the front surface to an image at least 2048*2048 pixels with an 'S' logo in the center.
Set the cutout opacity on the front surface to be an image that's black except for where the logo is, which should be white.
Edit the figure and suit as you want.
Another gotcha with Decals is that they work best on static surfaces. If the model they are painted on moves (e.g. applying a figure pose) then they may lose their position and need to be adjusted.
In this case, we just needed to move the Decal up to position it on her chest again. A more dynamic pose might require adjustments to rotation and other positioning. This is one reason why Decals are my last resort for editing a texture.
I hope that helps. Let me know if anything was unclear or if you have other questions.
First gotcha to remember is that IRay decals only show up in IRay mode. They will show up in a final render, but will only show in the preview window if you have selected "NVIDIA IRay" from the dropdown. When you're working with IRay decal nodes, you have to work in IRay mode or it's almost impossible. This may mean you need to work with a subset of your scene or the preview will be slow to update.
We're going to start with one of the decals from the Iray FireFight product since they have quirks of their own.
To start, we have a simple wall. This is a Primitive plane with a concrete shader applied.
Select the wall and add the "KAFF Standalone Decal" Prop.
Select the Decal prop and add the "KAFF Metal Bullet Holes" Material
You'll note that the prop helpfully disappears at this point. This is because the bullet holes are the only visible part of the surface and they are not being "painted" onto the wall.
Rotate your view so that you can see the bounding rectangle of the Decal prop and move it so that the front of the box is closer to the wall.
At this point you may see a "smear" of an image on the wall (or you may see the bullet holes correctly, it depends on the orientation of the wall).
If you don't see the bullet holes, rotate the Decal prop. In this case, A "Y Rotate" of 90 degrees brought it into the correct orientation.
Now, we're going to add the classic 'S' logo to a piece of clothing.
We start with a figure and a suit.
Select the suit and create an Iray Decal Node. (Create/New Iray Decal Node). Select the Decal Node, Select the Surface tab, Select the "Reverse" surface and bring the cutout opacity down to 0%. We are only going to use the "Front" surface. (But yes, that means a Decal can paint the front and back of an object at the same time).
Select the "Front" surface and apply a suitable shader. You want something that uses Horizontal and Vertical tile values of 1, otherwise the logo will be repeated. I usually use a white latex shader from Plastic and Latex Iray Shaders
Move the Decal up by adjusting the "Y Translate" until the white material shows on the suit.
Set the image for "Base Color" on the front surface to an image at least 2048*2048 pixels with an 'S' logo in the center.
Set the cutout opacity on the front surface to be an image that's black except for where the logo is, which should be white.
Edit the figure and suit as you want.
Another gotcha with Decals is that they work best on static surfaces. If the model they are painted on moves (e.g. applying a figure pose) then they may lose their position and need to be adjusted.
In this case, we just needed to move the Decal up to position it on her chest again. A more dynamic pose might require adjustments to rotation and other positioning. This is one reason why Decals are my last resort for editing a texture.
I hope that helps. Let me know if anything was unclear or if you have other questions.
This message has attachments images.
Please log in or register to see it.
The following user(s) said Thank You: Sarge395, bionicskillz, veggicidal
Please Log in or Create an account to join the conversation.
- Gincognifo
-
 Topic Author
- Away
- Junior Member
-

Less
More
05 May 2022 19:56 #74057
by Bully_pup
Replied by Bully_pup on topic Iray Decals / Iray FireFight
Gincognifo
Thank you for that! Thankfully I understand your instructions. I'm going to get started as soon I as I get home and on my computer. And, I'm pretty sure I'll have about a million questions. I really appreciate this.
Thank you for that! Thankfully I understand your instructions. I'm going to get started as soon I as I get home and on my computer. And, I'm pretty sure I'll have about a million questions. I really appreciate this.
Please Log in or Create an account to join the conversation.
- Bully_pup
-

- Offline
- Elite Member
-

Less
More
- Posts: 1225
- Thank you received: 297
Time to create page: 0.052 seconds